Sunday, September 12, 2010

Time to "Get Whipped"

It's been a long time coming. I've dreamed of the day when I would start my own business. The day it would become "official". Hours spent writing a business plan with four boys in my Entrepreneurship class. Countless hours of measuring, mixing, baking, and piping. Several back and forth e-mails trying to get everything juuust right. And then, it happened...


I'm "official". I have a logo. A Facebook page. A website in the works. A deal with a local cafe/coffeehouse that sells my cupcakes. I feel like I've finally made it. I still have a long way to go. Legal stuff -- blech. I guess you could say I'm prolonging that as long as I can, simply because I know it's going to take a lot of work, probably a good bit of money, and a lot of time. Time isn't something I necessarily have right now. Twelve hour days at school three days a week, up to twenty hours of working on the weekend. And let's not forget cooking, baking, cleaning, and organizing. Oh, and homework. There's a lot of that. But, I know it will all be worth it in the end. To know that I have accomplished something like starting my own business.

But let's get back to my business deal! Birdie's Cafe Coffeehouse in Westminster, MD is selling cupcakes by Whipped on a weekly basis. I have been looking to get more exposure so I contacted the owner and asked if this would be something she was interested in. She seemed very excited, and next Tuesday I'll be delivering my third dozen to her. 

     
{Vanilla Cupcakes with Vanilla Buttercream & Oreo Cupcakes with Oreo Buttercream for first order, Chocolate Cupcakes with Chocolate Buttercream & Peanut Butter & Jelly Cupcakes for second order}

The best part about this arrangement is I get to pick the flavors. So to start I've been doing one traditional flavor and one more "exotic". I haven't quite decided on this weeks flavors yet. Pretty sure I want to do Red Velvet but I haven't settled on the second. Suggestions are always welcome ;)


I'm really excited to see where my dream takes me. And I'm so glad that I have such supportive friends and family that stand behind me and encourage me every step of the way. I think that's the most important thing beside my passion for it, and I'm so thankful for all of them.

Now off to do homework aka daydream of cupcakes, haha.

Monday, September 6, 2010

Labor Day Goodies

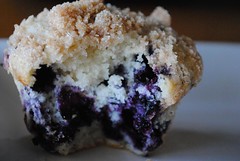
I thought that today was going to be the first day of my internship at WTMD. However, I should've confirmed with my supervisor because I could've saved myself a few hours and gas. Turns out she wasn't in today, so I drove down to school (with two dozen fresh blueberry muffins) for no reason. And what sucked even more was that I couldn't get a hold of the boy (he left his phone at home), who was at the Maryland State Fair (which I really wanted to go to today). I knew it would be crowded there and I didn't want to have to a) pay - they had free tickets and b) search all around the fairgrounds for him. Flustered, I ate a muffin then went to Starbucks before heading home where I enjoyed two more muffins, my hot chocolate, and ... MY CHAISE! The good part about having the house to myself is free range of my wonderful chaise. Short lived but it felt good.

I've made these muffins before, and this time decided to triple the recipe and use only fresh blueberries. I also (by accident) didn't follow the crumb topping recipe exactly, but I think it still tasted fabulous.


Best Blueberry Muffins Ever
Adapted from craftedmybones 
Makes 2 1/2 Dozen

Ingredients:

Muffins
  • 4 1/2 cups All-Purpose Flour
  • 2 1/4 cups Sugar
  • 1 1/2 teaspoons Salt
  • 2 Tablespoons Baking Powder
  • 1 cup Vegetable Oil
  • 3 Eggs
  • 1 cup Milk
  • 1 cup+ Blueberries (I didn't measure, used most of a 
Crumb Topping
  • 1/2 cups Sugar
  • 1/2 cups Flour (use 1/3 for a more crumb-like topping)
  • 4 Tablespoons Butter
  • 1 teaspoon Cinnamon
Directions:

Preheat oven to 400 degrees F. Line muffin cups with liners. Make crumb topping by mixing together ingredients with a fork.

Whisk dry ingredients into a large bowl. Add in vegetable oil, eggs, and milk; mixing until incorporated. Fold in blueberries.

Fill muffin cups about 2/3 full and sprinkle with one teaspoon crumb topping and bake for about 8-9 minutes, adding another teaspoon of crumb topping and baking for an additional 8-9 minutes, 18-20 minutes total.

-----


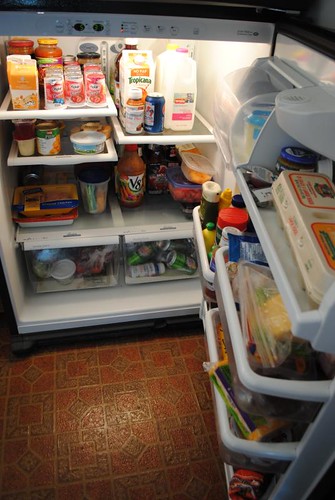
After enjoying my muffins, I decided I needed to head to the grocery store to pick up some things for dinner as well as other grocery necessities. I picked up some fruits and veggies, tons of frozen meals (perfect for me to take to school), granola cereal, Nature Valley granola bars, yogurt, water, and of course, the most recent issue of the Washingtonian. Once I got home, I had to reorganize the freezer and fridge so that everything fit nicely (and made me feel good).


Snack time came, and good thing I picked up a ripe avocado, cause I whipped up some guacamole. I kept it simple, just mashing the avocado and adding a little roasted tomato salsa. Served it with some multi-grain Tostitos and ate it all up. Perfect snack/lunch. The bowl was made by my grandfather. I've got a total of four bowls I think. As well as a fork, spoon, mixing spoon, and spatula. I've been using the mixing spoon/spatula a lot more lately, and am going to try and get in the habit of using the bowls as well.


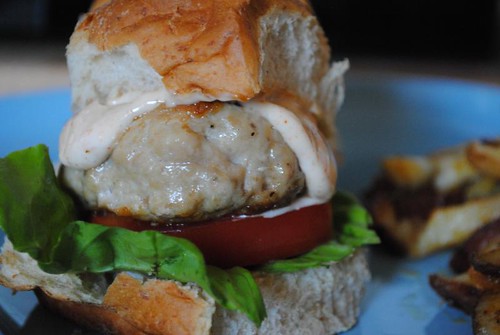
And then, it was onto dinner. I wanted to fix it relatively early so that I'd have enough sunlight for some decent pictures. I hate that a lot of the dinners I fix are later in the evening when the lighting sucks and I get sucky pictures. It's sad that I'm planning meals around the lighting, isn't it? Oh well. Okay, back to the meal. I had decided to make Chicken Sliders after glazing over How Sweet's Buffalo Chicken Burgers and Ezra Pound Cake's Rattlesnake Sliders. I also wanted to make a Chipotle Mayo because, well, I love mayo. And chipotle-ness. And have been wanting to make chipotle mayo for like, ever. So there you have it -- Chicken Sliders with Chipotle Mayo. Recipe and pictures below :)


Chicken Sliders with Chipotle Mayo
Serves 4
Chipotle Mayo
Makes about 1/2 cup
  • 6 Tablespoons Mayo
  • 1/2 teaspoon Ground Chipotle Chile
Chicken Sliders
Makes 8 sliders
  • 1 pound Ground Chicken
  • 1/2 teaspoon Salt
  • 1/2 teaspoon Ground Pepper
Thoroughly mix together mayo and ground chipotle. Put in an air-tight container and put in fridge until ready to use (can be made up to 2 days in advance).
For the sliders, preheat an electric griddle (or grill or grill pan) to medium-high. Mix salt and pepper with the ground chicken until fully incorporated. Shape into balls and flatten, placing each patty about an inch apart on the griddle. Cook, turning once or twice, about 8-10 minutes.
To assemble, toast a small whole wheat roll (like King’s Hawaiian Honey Wheat Rolls) and layer lettuce, tomato, and mayo on the roll. Top with burger and enjoy!


-----


And that was my day. No dessert this evening, was feeling a little lazy (I did make Cookies & Cream Cupcakes yesterday, but I'll save those for another blog). Also didn't get any homework/reading done. Oops. I did do yoga though. I'm feeling a little defeated by it though, I'm wondering if I'm doing it right. And I hate that I'm not that flexible/steady and had difficulties with today's lesson. I guess if I keep at it I'll only get better, but it's hard when you're doing it by yourself in your own home with no "formal" yoga training, haha. 


How did you celebrate your Labor Day?

Wednesday, September 1, 2010

Perfect together.

“I got to thinking about relationships and partial lobotomies. Two seemingly different ideas that might just be perfect together - like chocolate and peanut butter.” -- Carrie, Sex & the City

Oh, chocolate and peanut butter. You make me so happy. Especially when you combine one of my favorite candies into a cookie. Lucky for me I was sending a care package to my lovely friend Nicole, who is attending FIT in New York. I asked her what her favorite candy was, to which she replied Reese's. I didn't want to just send a bag of candy, and I had remembered seeing a recipe for Peanut Butter Cup Cookies that I knew would be perfect.


Peanut Butter Cup Cookies
adapted from Real Simple


1 1/2 cups All-Purpose Flour
1 teaspoon Baking Soda
1/2 teaspoon Kosher Salt
1/2 cup (1 stick) Unsalted Butter, at room temperature
3/4 cup Dark Brown Sugar
1/2 cup Granulated Sugar
1 Large Egg
1 teaspoon Pure Vanilla Extract
About 30 Mini Reese's Peanut Butter Cups, coarsely chopped
  1. Preheat oven to 375° and line two baking sheets with parchment paper.
  2. In a large bowl, whisk together dry ingredients.
  3. Cream the butter and sugars. Add the egg and vanilla and beat to combine.
  4. Add in the flour mixture until incorporated. Fold in the peanut butter cups.
  5. Using a medium sized scoop, drop dough about 2 inches apart onto prepared baking sheets (*see note below). Bake for about 10 minutes, until light brown around the edges (centers will still be soft). Remove from baking sheets and allow to cool on wire racks.

Things I learned from making these cookies:


  • Do not bake more then 10 minutes
  • Chill the dough (I did one dozen before chilling the dough, and also overbaked them so chilling the dough was a good idea)
  • Don't put mini Reese's in a food processor (they get too ground instead of chopped. Breaking them up with my fingers was much easier. I also think I'd use regular sized ones next time)
  • The recipe does not make 48 cookies. Unless you're using an itsy bitsy cookie scoop, which I do not.
  • *Simply folding the broken Reese's into the batter isn't enough (and your cookies won't look like the ones in the picture). You must flatten the cookies a bit after placing them on the parchment and push a few more pieces of crushed Reese's onto the tops of the cookies. 


And also, as promised, here is the recipe for Peanut Butter Chip Brownies from my previous post.


Peanut Butter Chip Brownies

4-1oz squares Unsweetened Baking Chocolate
10 Tablespoons Butter
2 cups Sugar
4 Large Eggs
2 teaspoons Pure Vanilla Extract
1 1/2 cups Flour
1 teaspoon Baking Powder
1 teaspoon Salt
1-10oz bag Reese's Peanut Butter Chips (approx 1 2/3 cups)
  1. Preheat oven to 350° and grease a 9x13 baking pan. 
  2. Microwave (or use a double boiler) chocolate and butter until melted. Set aside to cool.
  3. Whisk together dry ingredients (excluding peanut butter chips*) in bowl.
  4. Beat sugar, eggs, and vanilla on high speed for five minutes.
  5. Beat in chocolate mixture on low speed. Beat in flour mixture until blended.
  6. Spread in pan and sprinkle top with peanut butter chips. Bake for about 20 minutes or until cake tester comes out clean.
*If you wanted the chips to be mixed in with the batter, simply toss with a little flour and fold them in after step 5.

Waffles Take Two.

I made homemade waffles back in July using a recipe from Tasty Kitchen, and wasn't super pleased with the results. So when I had my mental health day at my MiMi's last month, I came across "50 Pancakes & Waffles" insert from the Food Network Magazine and she told me to take it home with me. It's been sitting on my desk since, and I've been wanting to make waffles so today I finally did it. 

I modified the "Classic Waffle" recipe, and was quite pleased with the results. I will admit, I was a little skeptical at first because I wasn't sure about the shortening. I don't recall ever putting shortening in waffles before, and I'm not really sure what it does for the batter, so I guess I really can't complain. I also added vanilla, because I love vanilla and add it to everything. The batter was thick, and it made enough for the three of us and a few extra. Next time I will double the batch so I can stick plenty in the freezer for quick breakfasts. I will also add some mini chocolate chips, because pancakes and waffles are always better with chocolate chips (except the previous recipe I tried, haha).


Whole Wheat Waffles
adapted from Food Network Magazine
posted on Tasty Kitchen

2 cups Whole Wheat Flour
4 teaspoons Baking Powder
2 Tablespoons Sugar
1 teaspoon Salt
2 large Eggs
1 1/2 cups Milk
5 Tablespoons Shortening
4 Tablespoons Butter
1 teaspoon Pure Vanilla Extract

1. Melt shortening and butter in microwave at 20 second intervals until fully melted. Meanwhile, whisk together dry ingredients in large bowl and preheat your waffle iron.
2. Add liquid ingredients to dry and whisk until incorporated (do not overmix!)
3. Ladle mix into waffle iron and cook until crisp.
Makes 10 square waffles.